🔤 Custom Characters
The Custom Characters feature allows you to precisely control which characters are included when generating fonts, optimizing font file sizes by including only the characters actually used in your project.
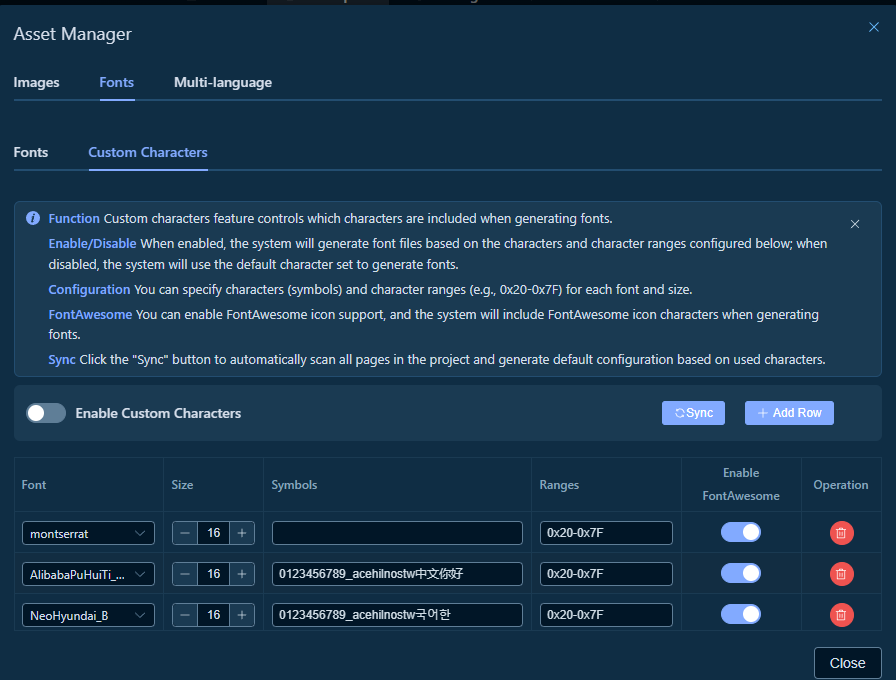
📍 Accessing Custom Character Configuration
Custom character configuration is located in the Asset Manager under the "Fonts" tab:
- In the toolbar, click the "Asset Manager" button
- In the Asset Manager dialog, click the "Fonts" tab
- In the Fonts tab, click the "Custom Characters" sub-tab
- You will see the custom character configuration interface
🚀 Quick Start
Step 1: Enable Custom Characters
- In the custom character configuration interface, find the "Enable Custom Characters" toggle
- Switch the toggle to "On" state
- The system will generate font files based on the characters and character ranges configured in the table below
Tip: When the toggle is off, the system will use the default character set to generate fonts.
📚 Feature Overview
1. Enable/Disable Custom Characters
Function - When enabled, the system will generate font files based on the characters and character ranges configured in the table below - When disabled, the system will use the default character set to generate fonts
Usage - Click the "Enable Custom Characters" toggle to switch between enabled/disabled states - The state is automatically saved to the project configuration
2. Character Configuration
Custom character configuration supports two methods:
Symbols
Directly specify the characters to include, for example:
- 0123456789_acehilnostw中文你好
- 0123456789_acehilnostw국어한
Use Cases - When you need precise control over included characters - When characters are few and non-contiguous - When including special symbols or specific language characters
Ranges
Use hexadecimal ranges to specify character sets, for example:
- 0x20-0x7F: Basic ASCII character set
- 0x20-0x7F,0x4E00-0x9FA5: ASCII + Common Chinese characters
- 0x20-0x7F,0xAC00-0xD7A3: ASCII + Korean characters
Format
- Single range: 0xStartValue-0xEndValue
- Multiple ranges: Separated by commas, e.g., 0x20-0x7F,0x4E00-0x9FA5
- Range values use hexadecimal format (0x prefix)
Common Character Ranges
- 0x20-0x7F: Basic ASCII characters (space to delete)
- 0x4E00-0x9FA5: Common Chinese characters (CJK Unified Ideographs)
- 0xAC00-0xD7A3: Korean syllable characters
- 0x3040-0x309F: Japanese Hiragana
- 0x30A0-0x30FF: Japanese Katakana
3. FontAwesome Support
Function - When enabled, the system will automatically include FontAwesome icon characters when generating fonts - Suitable for projects that need to use FontAwesome icons
Usage - In the table's "Enable FontAwesome" column, toggle the switch for the corresponding font configuration - FontAwesome support can be set separately for different fonts and sizes
4. Sync Function
Function - Automatically scans all pages in the project - Extracts actually used characters - Automatically generates default configuration based on used characters
Usage 1. Click the "Sync" button 2. The system will display a confirmation dialog, indicating that existing configuration will be overwritten 3. After clicking "Confirm", the system starts scanning the project 4. After scanning is complete, configuration is automatically generated and populated in the table
Note: The sync function will overwrite existing custom character configuration. Use with caution.
✏️ Configuration Steps
Adding Font Configuration
- In the custom character configuration interface, click the "+ Add Row" button
- The system will add a new configuration row to the table
- Configure each parameter:
- Font: Select a font from the dropdown list
- Size: Use
-and+buttons to adjust font size, or enter directly - Symbols: Enter characters to include (optional)
- Ranges: Enter character range, e.g.,
0x20-0x7F(required) - Enable FontAwesome: Toggle whether to include FontAwesome icons
- Configuration is automatically saved
Editing Font Configuration
- Find the configuration row to edit in the table
- Directly modify the corresponding fields:
- Click the Font dropdown to select a font
- Click the
-or+buttons for Size to adjust font size - Enter characters in the Symbols input box
- Enter character range in the Ranges input box
- Toggle the Enable FontAwesome switch
- Changes are automatically saved after modification
Deleting Font Configuration
- Find the configuration row to delete in the table
- Click the Delete button (trash icon) on the right side of the row
- The configuration will be immediately deleted and automatically saved
🎯 Usage Examples
Example 1: Configuring Chinese Font
If your project needs to display Chinese characters, you can configure it like this:
- Click "+ Add Row" to add a configuration row
- Set parameters:
- Font: Select
AlibabaPuHuiTi(or other Chinese font) - Size: Set to
16 - Symbols: Enter
0123456789_acehilnostw中文你好(characters actually used in the project) - Ranges: Enter
0x20-0x7F,0x4E00-0x9FA5(ASCII + Common Chinese) - Enable FontAwesome: Enable or disable as needed
- Configuration is automatically saved
Example 2: Configuring Multi-language Fonts
If your project needs to support multiple languages:
- Chinese Configuration:
- Font:
AlibabaPuHuiTi - Size:
16 -
Ranges:
0x20-0x7F,0x4E00-0x9FA5 -
Korean Configuration:
- Font:
NeoHyundai_B - Size:
16 - Symbols:
0123456789_acehilnostw국어한 -
Ranges:
0x20-0x7F -
English Configuration:
- Font:
montserrat - Size:
16 - Ranges:
0x20-0x7F - Enable FontAwesome: On
Example 3: Using Sync Function for Quick Configuration
If you're unsure which characters are needed, you can use the sync function:
- Ensure that components using fonts have been added to the project
- Click the "Sync" button
- Confirm to overwrite existing configuration
- The system automatically scans and generates configuration
- Adjust the generated configuration as needed
💡 Tips
1. Character Range Optimization
Recommendations - Prefer using character ranges (Ranges) for contiguous character sets - Use symbols (Symbols) for scattered special characters - Both can be used simultaneously; the system will merge all characters
Example
Ranges: 0x20-0x7F,0x4E00-0x9FA5
Symbols: ©®™€£¥
This configuration will include ASCII, common Chinese characters, and special symbols.
2. Font File Size Optimization
Tips - Only configure characters actually used in the project to avoid including unnecessary characters - After using the sync function, check the generated configuration and remove unneeded characters - For multi-language projects, configure different fonts and character sets for different languages
3. Character Range Format Validation
Notes - Character ranges must use hexadecimal format (0x prefix) - Multiple ranges are separated by commas, no spaces allowed - When the format is incorrect, the system will display a warning
Correct Format Examples
- ✅ 0x20-0x7F
- ✅ 0x20-0x7F,0x4E00-0x9FA5
- ❌ 20-7F (missing 0x prefix)
- ❌ 0x20-0x7F, 0x4E00-0x9FA5 (space after comma)
4. Font and Size Combinations
Important Notes - Each font and size combination is unique - Duplicate font + size combinations cannot be added - The system will automatically detect and warn about duplicates
5. Sync Function Usage Recommendations
Best Practices - Use the sync function to quickly generate configuration in the early stages of project development - After syncing, check the generated configuration and adjust according to actual needs - For large projects, syncing may take some time; please be patient
🔗 Related Features
- Asset Manager - Access custom character configuration
- Font Management - Manage project font resources
- Multi-language Feature - Configure multi-language font schemes
- Code Generation - Generate font files with custom characters
Workspace Documentation: ← Back to Workspace | Canvas | Component Library | Component Tree | Properties Panel | Event System | Multi-language | Toolbar | Shortcuts