UART
1 功能概述
UART (Universal Asynchronous Receiver and Transmitter) 通用异步接收器/发送器,用来实现不同设备之间的全双工或半双工数据交换。BK7258具有3个uart,目前uart0为cp侧独占使用(供log输出使用,ap侧禁止使用),ap侧仅支持使用uart1和uart2这两个uart。
UART相关的理论介绍参考: UART的驱动
2 代码路径
- demo路径:
ap\components\bk_cli\cli_uart.c
- 驱动源码路径:
ap\middleware\driver\uart\uart_driver.cUART相关的api介绍参考: UART的api介绍
3 uart相关宏配置
NAME
Description
File
value
CONFIG_UART0
UART0使能配置
ap\middleware\soc\bk7258_ap\bk7258_ap.defconfign
CONFIG_UART1
UART1使能配置
ap\middleware\soc\bk7258_ap\bk7258_ap.defconfign
CONFIG_UART2
UART2使能配置
ap\middleware\soc\bk7258_ap\bk7258_ap.defconfign
CONFIG_UART_PRINT_PORT
配置打印输出log的UART口
ap\middleware\soc\bk7258_ap\bk7258_ap.defconfig1
CONFIG_PRINTF_BUF_SIZE
配置打印输出log的BUFFER大小
ap\middleware\soc\bk7258_ap\bk7258_ap.defconfig256
CONFIG_KFIFO_SIZE
配置UART对应软件FIFO的大小
ap\middleware\soc\bk7258_ap\bk7258_ap.defconfig128
CONFIG_UART_ERR_INTERRUPT
UART使能错误中断
ap\middleware\soc\bk7258_ap\bk7258_ap.defconfigy
CONFIG_UART_TX_DMA
配置UART的DMA的TX功能即拷贝RAM数据到UART的FIFO
ap\middleware\soc\bk7258_ap\bk7258_ap.defconfign
CONFIG_UART_RX_DMA
配置UART的DMA的RX功能即从UART的FIFO数据拷贝到RAM
ap\middleware\soc\bk7258_ap\bk7258_ap.defconfign
UART_RX_DMA_KFIFO_SIZE
配置UART的RX的DMA的KFIFO的大小
ap\middleware\soc\bk7258_ap\bk7258_ap.defconfig128
4 UART PIN脚描述
UART0对应开发板子上的uart0,且对应有1组PIN脚,对应的硬件管脚如下:
UART0功能
组0
UART0_TX
GPIO11
UART0_RX
GPIO10
UART1对应开发板子上的uart1,且对应有1组PIN脚,对应的硬件管脚如下:
UART1功能
组0
UART1_TX
GPIO0
UART1_RX
GPIO1
- UART2对应开发板子上的uart2,且对应有1组PIN脚,对应的硬件管脚如下:
UART2功能
组0
UART2_RX
GPIO40
UART2_TX
GPIO41
5 UART demo 配置
demo支持的命令如下表:
Command
Param
Description
uart_driver {init|deinit}
{init|deinit}:
init/deinit the uart resoure common
uart {id} init [baud_rate] [data_bits]
[parity] [stop_bits] [flow_ctrl]
[src_clk] [rx_dma_en] [tx_dma_en]
{id}:uart id,value range 1 ~ 2
init uart and set working parameters
{baud_rate}:uart baud rate
{data_bits}: support value range 5 ~ 8 bits
{parity}: support parity mode
{stop_bits}:the stop bits len
{flow_ctrl}: not support flow ctrl
{src_clk}:uart working clock source
{rx_dma_en}: enable uart rx dma
{tx_dma_en}: enable uart tx dma
uart_config
{id}
baud_rate {value}
{value}:support baud rate
set uart working parameters
data_bits {value}
{value}:support value range 5 ~ 8 bits
parity {value}
{value}:support parity none、 odd、 even
stop_bits {value}
{value}:support 1 or 2 bits
flow_ctrl {value}
{value}:support 0 or 1
rx_thresh {value}
{value}:support value range 0 ~ 255 bits
tx_thresh {value}
{value}:support value range 0 ~ 255 bits
rx_timeout{value}
{value}:support value range 0 ~ 3 bits
uart_int {id} {enable|disable|reg} {tx|rx}
{id}:uart id,value range 1 ~ 2
enable|disable uart tx|rx interrupt and register uart tx|rx handler
{enable|disable}:enable|disable tx|rx interrupt
{tx|rx}: register tx|rx interrupt handler
uart {id} {read|write}
{length}
{id}:uart id,value range 1 ~ 2
read specified length of data through uart
{read|write}: read|write operation
{length}: length to be read|write
备注
-1.UART 模块的时钟源为 26M Hz,波特率是从 26M Hz 时钟源中分出的;
-2.计算方法为“除数 = (时钟源值 / 波特率)-1”。然后软件将除数值设置为 UART 寄存器;
-3.例如: 如果我们想设置波特率为 115200,则除数值为 = (26000000 / 115200)-1 == 224。软件将 224 设置为 UART 寄存器。因此,如果我们想设置其他波特率,只需计算除数值并将其设置为 UART 寄存器即可。(注意:除数值应该是整数类型)。
6 UART demo 命令行演示
使用2块bk7258开发板,按照下图进行连接(建议两个板子共地,以免数据采样不准确):
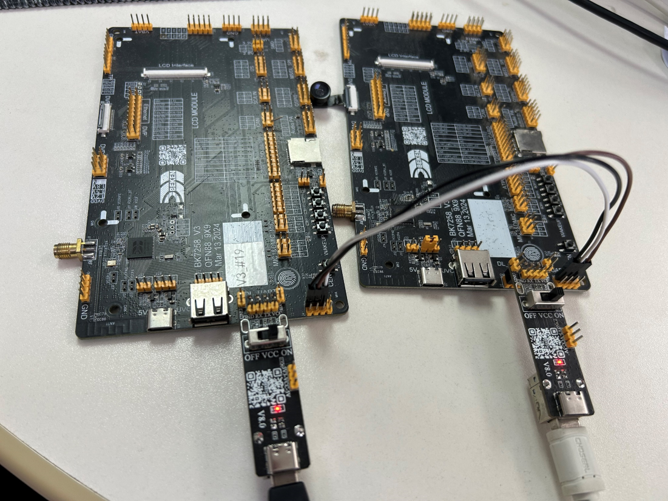
Figure 1. 将2块开发板通过UART对接
开始输入cli命令测试:
启动开发板,对2块开发板分别输入初始化命令:
板1:(初始化命令): ap_cmd uart 1 init 115200 3 0 0 0 1 0 0
[14:08:15.698]发→◇ap_cmd uart 1 init 115200 3 0 0 0 1 0 0
[14:08:15.713]收←◆ap_cmd uart 1 init 115200 3 0 0 0 1 0 0
os:I(378658):create shell_handle, tcb=28078f90, stack=[28077368-28078f68:7168], prio=5
$
$ap0:cli:I(378522):uart init, uart_id=1
板1:(默认配置初始化): ap_cmd uart 1 init
[14:07:04.565]发→◇ap_cmd uart 1 init
[14:07:04.565]收←◆ap_cmd uart 1 init
os:I(307518):create shell_handle, tcb=28078f90, stack=[28077368-28078f68:7168], prio=5
$ap0:cli:E(307382):invalid argc,use default config
ap0:cli:I(307382):uart init, uart_id=1
板2:(或者以下命令): ap_cmd uart 1 init 115200 3 0 0 0 1 0 0
[14:10:26.530]发→◇ap_cmd uart 1 init 115200 3 0 0 0 1 0 0
[14:10:26.546]收←◆ap_cmd uart 1 init 115200 3 0 0 0 1 0 0
os:I(455910):create shell_handle, tcb=28078f90, stack=[28077368-28078f68:7168], prio=5
$
$ap0:cli:I(455704):uart init, uart_id=1
板2:(使用默认配置) ap_cmd uart 1 init
[14:10:22.823]发→◇ap_cmd uart 1 init
[14:10:22.839]收←◆ap_cmd uart 1 init
os:I(452206):create shell_handle, tcb=28078f90, stack=[28077368-28078f68:7168], prio=5
$
$ap0:cli:E(452000):invalid argc,use default config
ap0:cli:I(452002):uart init, uart_id=1
C) 板1 发送数据,板2接收数据;
- 板1: ap_cmd uart 1 write 10 //板1发送数据(其中,发送数据内容在测试代码中已自动赋值)
- 板2: ap_cmd uart 1 read 10 0 //板2接收数据
D) 板2 发送数据,板1接收数据;
板2: ap_cmd uart 1 write 20 //板2发送数据
[14:25:43.416]发→◇ap_cmd uart 1 write 20
[14:25:43.416]收←◆ap_cmd uart 1 write 20
os:I(210366):create shell_handle, tcb=28078f90, stack=[28077368-28078f68:7168], prio=5
$
$ap0:cli:I(210232):uart write, uart_id=1, data_len:20
板1: ap_cmd uart 1 read 20 0 //板1接收数据
[14:25:48.436]发→◇ap_cmd uart 1 read 20 0
[14:25:48.436]收←◆ap_cmd uart 1 read 20 0
os:I(214244):create shell_handle, tcb=28078f90, stack=[28077368-28078f68:7168], prio=5
$
$ap0:cli:I(214110):uart read, uart_id=1, time_out:0 data_len:20
ap0:cli:I(214110):recv_buffer[0]=0x0
ap0:cli:I(214110):recv_buffer[1]=0x1
ap0:cli:I(214110):recv_buffer[2]=0x2
ap0:cli:I(214110):recv_buffer[3]=0x3
ap0:cli:I(214110):recv_buffer[4]=0x4
ap0:cli:I(214110):recv_buffer[5]=0x5
ap0:cli:I(214110):recv_buffer[6]=0x6
ap0:cli:I(214110):recv_buffer[7]=0x7
ap0:cli:I(214110):recv_buffer[8]=0x8
ap0:cli:I(214110):recv_buffer[9]=0x9
ap0:cli:I(214110):recv_buffer[10]=0xa
ap0:cli:I(214110):recv_buffer[11]=0xb
ap0:cli:I(214110):recv_buffer[12]=0xc
ap0:cli:I(214110):recv_buffer[13]=0xd
ap0:cli:I(214110):recv_buffer[14]=0xe
ap0:cli:I(214110):recv_buffer[15]=0xf
ap0:cli:I(214110):recv_buffer[16]=0x10
ap0:cli:I(214110):recv_buffer[17]=0x11
ap0:cli:I(214110):recv_buffer[18]=0x12
ap0:cli:I(214110):recv_buffer[19]=0x13