Lan UDP/TCP
1 Function Overview
This function is based on LAN UDP/TCP doorbell demonstration project.
2 Code Path
UDP-demo:./projects/media/doorbell/main/src/doorbell_udp_service.c
TCP-demo:./projects/media/doorbell/main/src/doorbell_tcp_service.c
3 Introduction to cli commands
This function mainly relies on APP to use the configuration, and does not require cli command auxiliary control for the time being
4. Compile the command
Compile the PROJECT command: make bk7256 PROJECT=meida/doorbell
5 Presentation
Note
The current apk only developed Android system, and then use the APK for network transmission before you need to turn on Bluetooth.
Set the router distribution information, as shown in the following figure:

Figure 1.main interface
Select the position of 1 in the main interface to arrive at the setting interface, as shown below:
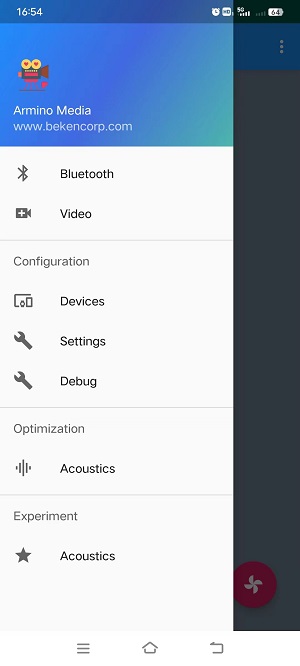
Figure 2.main Setting interface
Select:
Settings, to arrive at the network configuration interface, as shown in the following picture:
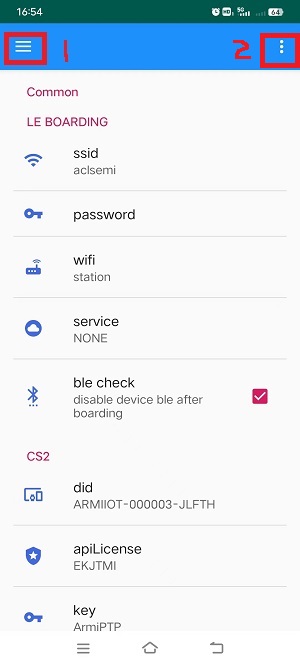
Figure 3.network setting interface
3.1 Many configuration types can be distinguished here:
Select:
wifi, in the figure above, there are two options of “station/soft ap”, indicating that the device is used as: station or softap.Suppose you select:
station, in the figure above:ssid, indicates the ssid (name) of the router connected to the board, and:password, indicates the password connected to the router, and the wifi of the phone needs to be connected to this router;Suppose you select:
soft ap, in the figure above:ssid, indicates the ssid (name) when the board is used as softap, and:password, indicates the password needed to connect the board, the wifi of the phone also needs to be connected to softap;Suppose that in the figure above, select:
wifi, select:station, and the name and password have been configured with the correct values.Select:
servece, in the figure above, there is “NONE/P2P_CS2/LAN_UDP/LANTCP”, if we choose to use UDP transmission, select “LAN_UDP”; If TCP is selected, “LAN_TCP” is selected. The default is “NONE”, which is invalid. “LAN_UDP/LANTCP” should be configured.
3.2 Select the position of 1 in the figure above to reach the main interface, and select:Bluetooth, to execute Bluetooth distribution network, and reach the Bluetooth distribution network interface, as shown below:
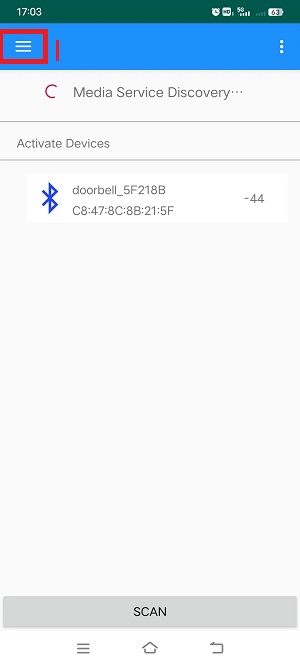
Figure 4.bluetooth set network interface
select in the figure above:
SCAN, scan to the broadcast issued by the board, the default broadcast name is:doorbell_xxx, if there are multiple in the network, you can find through the Bluetooth address, select the broadcast, a dialog box will pop up, select:Connect.After the connection is successful, still select the position of 1 in the figure above to reach the main interface;
Then select:
Videoto reach the main interface;Then select the position of 2 in the main interface, similar to a small fan icon, a dialog box will pop up, select:
Connect, wait for the connection to succeed, as shown below;

Figure 5.device connet interface
Still select the position of 1 in the main interface, arrive at the main interface, select:
Devices, arrive at the device configuration interface of:Devices, as shown in the following picture:
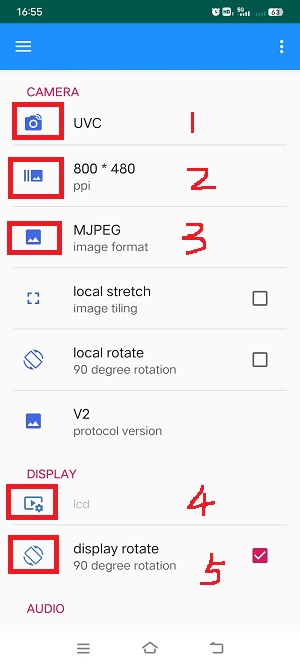
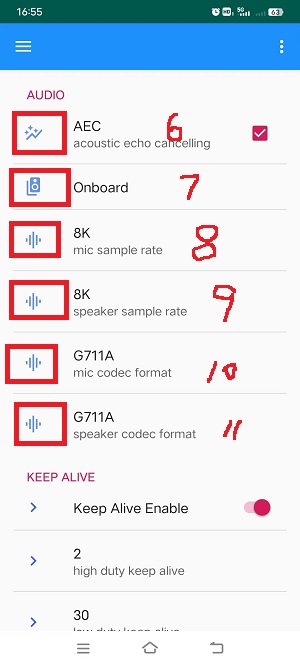
Figure 6.device setting interface
In the device configuration interface, you can configure “camera”, “DISPALY” and “AUDIO”.
As shown in Figure 1, select the type of camera to open: DVP/UVC;
As shown in Figure 2, select the output resolution of the camera and select the resolution supported by the camera;
In the position of Figure 3, select the format of the APK to receive video data: MJPEG/H264;
In the position shown in Figure 4, select the LCD screen type to be opened, which needs to match the LCD screen connected on the board;
For the position shown in Figure 5, select whether to rotate 90° when it is displayed on the LCD screen. This option is not selected by default.
In the position shown in Figure 6, select whether to support AEC echo cancellation (default).
For the position in Figure 7, select the source of the audio data received by the APK: Onboard/UAC, indicating Onboard audio /UAC audio, and onboard by default.
For the position in Figure 8, select MIC sampling rate: 8K/16K, 8K is selected by default;
For the position in Figure 9, select Speaker sample rate: 8K/16K. By default, 8K is selected.
For the position in Figure 10, select MIC encoding mode: G711A/PCM/G711U, the default choice; G711A;
For the position in Figure 11, select Speaker encoding mode: G711A/PCM/G711U (default); G711A;
select the top corner “三”, arrive at the main interface, and select:
Video, in the main interface, arrive at the main interface, and select the small fan icon in the lower right corner, three buttons pop up, as shown in the following picture:
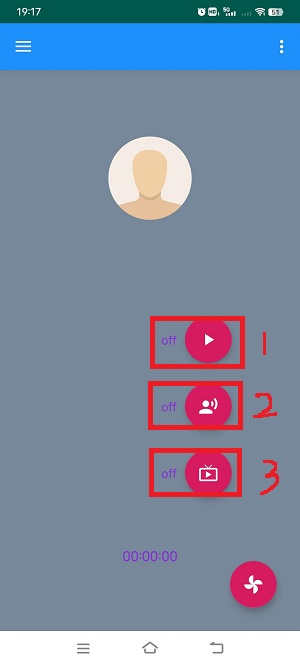
Figure 7.open/close setting interface
In the position of 1 in the figure above, switch the video function;
Position 2 in the figure above, switch the audio function;
Position 3 in the figure above, switch the screen display function;