MEDIA_TRA
1 Function overview
Multimedia mutual transmission function, two-way audio transmission between the two boards, video is one for collecting video images, and the other is responsible for receiving and displaying on the LCD screen
2 code paths
demo path:
project/av_client/main/av_client_main.c,project/av_server/main/av_server_main.c,components/demos/media/doorbell,components/demos/media/av_demo
3 Introduction to cli commands
The commands supported by the demo are as follows:
Command
Param
Description
- doorbell udp_c [param1] [param2]
[param3] [param4]
param1:camera_type
set the camera type used
param2:camera_ppi
set the camera output resolution
param3:LCD ppi
LCD screen support resolution
param4:LCD name
LCD screen name
doorbell udp_s [param1] [param2]
param3:LCD ppi
LCD screen support resolution
param4:LCD name
LCD screen name
av_udp_test param
param:current chip role
udp transfer play client or server
demo运行依赖的宏配置:
NAME
Description
File
value
CONFIG_DOORBELL
support DOORBELL
middleware\soc\bk7256\bk7256.defconfigy
CONFIG_JPEG_ENCODE
suport hw jpeg ecoder
middleware\soc\bk7256\bk7256.defconfigy
CONFIG_CAMERA
suport use dvp camera
middleware\soc\bk7256\bk7256.defconfigy
CONFIG_CAMERA_USE_I2C1
suport use I2C1
middleware\soc\bk7256\bk7256.defconfigy
CONFIG_AUDIO
support audio function
middleware\soc\bk7256\bk7256.defconfigy
CONFIG_LCD
support LCD function
middleware\soc\bk7256\bk7256.defconfigy
CONFIG_USB_UVC
support UVC camera
middleware\soc\bk7256\bk7256.defconfigy
CONFIG_AV_DEMO
support av transfer
middleware\soc\bk7256\bk7256.defconfigy
4 Presentation Introduction
The steps performed by the demo are as follows:
Prepare dvp camera or UVC camera, LCD screen (rgb or 8080), speak, and the connection configuration is shown in Figure 1 below
- Compile two versions:
make bk7256 PROJECT=av_client
make bk7256 PROJECT=av_server
Burn and run
Because the video is unidirectional, one board is responsible for capturing the image and sending it to another board via UDP, and the other board receives the image data, decodes it and displays it on the LCD screen. Therefore, plug in the board that the camera is responsible for collecting, burn the version compiled by av_client, and burn the version compiled by av_server with LCD screen, and it will run automatically after power-on.
- Description of Figure 1
1: Serial port power supply
2: USB&UVC camera interface
3: DVP camera interface
4: MIC acquisition
5: speak interface
6: 320*480 8080 screen
7:480*272 RGB screen
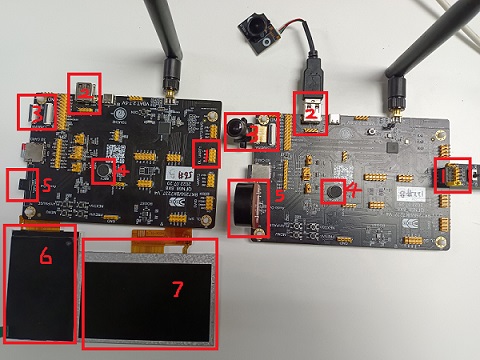
Figure 1. av transfer demo
Note
For this method of running the case, UVC (resolution of 640*480) is used by default, and LCD is used by default (resolution of 480*272).
5 The use of cli commands
The above demo needs to compile two versions, and it has been integrated, no need to enter any command, the default power-on will run the two-way intercom function. Currently, customers are also supported to send their own commands to realize the function of two-way intercom. The compiled version: make bk7256;
- Definition of macro
For the BK7256 version, the macro CONFIG_AV_DEMO is closed by default on the library, and it needs to be manually opened before compiling, and then compiling;
- The role definition of the board
ap ssid key channel: start softap on the board connected to the screen, customize ssid, key and channel, as shown in the 56#B board above
sta ssid key: start the station on the board connected with the camera, and connect the ap, as shown in the picture above 122#B board
- Turn on two-way voice
56#B: av_udp_test server
122#B: av_udp_test client
- Turn on video transmission
56#B: doorbell udp_s 480X272
480X272 is the resolution of the corresponding LCD
122#B: doorbell udp_c uvc|dvp 640X480
uvc|dvp: Indicates the camera type of the application, dvp or uvc, only one is supported at a time, if not written, the default is dvp;
640X480: Indicates the resolution of the camera output, other resolutions are also supported, if not written, the default is 640X480;