Video_transfer
1 Overview
The function of image transmission is mainly to compress and encode the original data collected by the dvp/uvc sensor through the jpeg encode module, and then send the data to the mobile phone by means of WiFi connection. The packet is parsed, and then the encoded video data stream is displayed in real time.
2 Code Path
demo path:
./components/demos/media/video/video_transfer/video_transfer.c
3 Client command
The commands support by demo
Command
Param
Description
- video_transfer param1 param2 [param3]
param4 param5
param1:connect method
wifi connecttion type
param2:ssid
ssid
param4:key
key
param4:camera_type
camera_type
param5:resolution
resolution
param6:frame_rate
frame_rate
video_transfer start
param:NULL
start transfer
video_transfer stop
param:NULL
stop transfer
The macro configuration that the demo runs depends on:
NAME
Description
File
value
CONFIG_JPEG_ENCODE
support hw jpeg encode
middleware\soc\bk7256\bk7256.defconfigy
CONFIG_CAMERA
suport use dvp camera
middleware\soc\bk7256\bk7256.defconfigy
CONFIG_USE_APP_DEMO_VIDEO_TRANSSER
support video transfer
middleware\soc\bk7256\bk7256.defconfigy
CONFIG_NET_WORK_VIDEO_TRANSFER
support wifi transfer
middleware\soc\bk7256\bk7256.defconfigy
CONFIG_COMPONENTS_P2P
support p2p transfer
middleware\soc\bk7256\bk7256.defconfign
CONFIG_CAMERA_USE_I2C1
suport use I2C1
middleware\soc\bk7256\bk7256.defconfigy
4 Presentation Introduction
The steps performed by the demo are as follows:
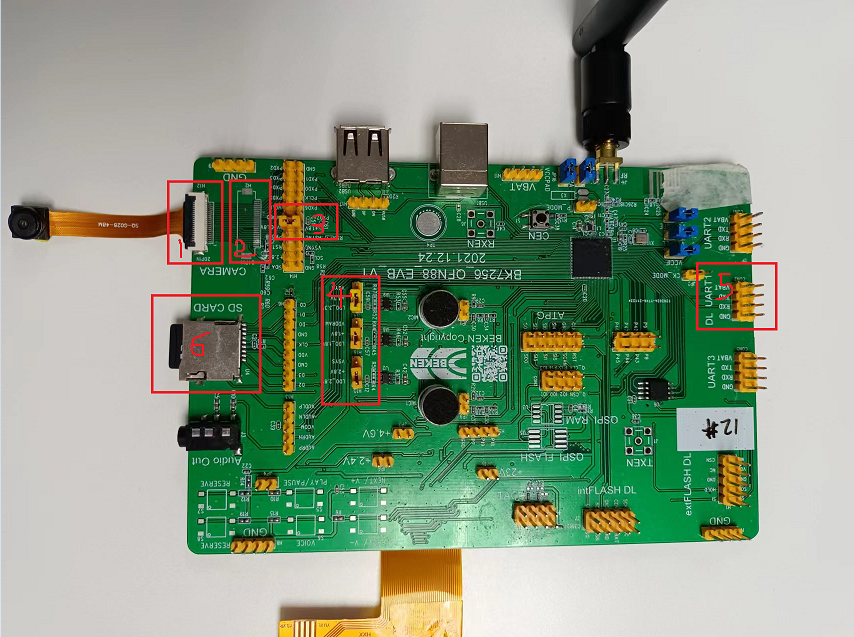
Prepare the dvp camera, the connection method is shown in Figure 1:
The camera used in position 1 in the figure is gc0328c(20-pin), and supports a resolution of 640*480
When only the app image transmission command is executed, the operation is as follows:
Send the following commands in sequence:
To test the picture of dvp camera: video_transfer -a test 12345678 dvp_jpg 640X480 25
If you test the h264 image of the dvp camera: video_transfer -a test 12345678 dvp_h264 640X480 20. (dvp needs to support h264 compressed data output, and the app supports h264 data)
If testing the image of the uvc camera: video_transfer -a test 12345678 uvc_jpg 640X480 20
If testing the h264 image of the uvc camera: video_transfer -a test 12345678 uvc_h264 640X480 20 (uvc needs to support h264 compressed data output, and the app supports h264 data output)
Connect the mobile phone wifi to the route of the test name, the password is: 12345678
After the connection is successful, open the image transmission app.
The camera used in position 2 in the above picture is hm1055(24-pin), dev_id=6, and supports 1280*720 resolution
If you use the hm1055 camera to start image transmission, send the following commands in sequence:
video_transfer -a test 12345678 1280X720 25
The mobile phone wifi is connected to the route of the test name, the password is: 12345678
3. After the connection is successful, open the app of the image transmission. Figure 2 is a schematic diagram of the app, The operation of the image transmission app is shown in Figures 3-6.
Figure 3 is the main interface of the app
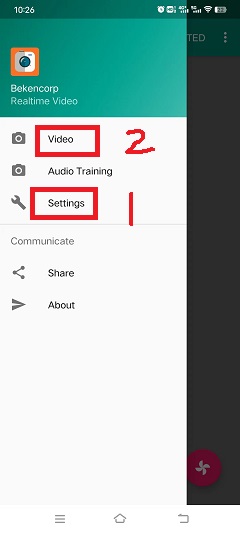
Among them, choose 1 to see Figure 4.
1: Settings menu;
2: Update apk and rollback apk menu;
Figure 4 is the setting interface menu
Among them:
1: For the setting interface as shown in Figure 5;
2: button to return to the main interface;
Figure 5 is the real setting interface
Among them, the setting instructions are as follows, after the setting is completed, return to the main interface of Figure 3
1: Set the solution, currently support video_transfer and doorbell, select video_transfer here;
2: Set the data transmission mode, currently only supports UDP, and UDP is selected by default;
3: Set the ip address of the peer, the default is
192.168.0.1in ap mode, and it is not required to be modified, and in sta mode, it is set to the ip address of the peer;4: Set the camera type, currently supports DVP and UVC, set according to the type of camera you use;
5: Set the output resolution of the camera;
6: Set the resolution of the LCD output, according to the LCD screen resolution you use, video_transfer not support lcd display;
Figure 6 is the function enable setting interface
Among them, the function enable description is as follows:
1: Switch video image transmission;
2: switch voice;
3: Photo switch, currently not supported;
4: Switch LCD screen display;
Note
Set the peer IP address in Figure 4. When the board is softap, the default is 192.168.0.1.
When the board is used as a staion, the mobile phone and the board are connected to the same ap, and the filled IP address
can be passed through the command `` ip`` to get.
In addition, the app also supports the function of mobile phone image transfer, that is, the command video_transfer -a|s ssid key,
but step 1 in Figure 4 must be set to video_transfer mode.
The apk download address: http://dl.bekencorp.com/apk/RealtimeVideo.apk

Figure 1. sensor connect evb

Figure 2. doorbell apk

Figure 3. RealtimeVideo_app Main screen

Figure 4. RealtimeVideo_app Set menu

Figure 5. RealtimeVideo_app set

Figure 6. RealtimeVideo_function set
5 Detailed configuration and its description
video_transfer -s|a ssid [key] [camera_type] [ppi] [fps]
-a|s: device as softap or station
ssid: softap or station name
key: softap or station connect key
- camera_type: reference
media_camera_type_t
“dvp_jpg” means: use dvp camera, and the output is JPEG data;
“dvp_h264” means: use a dvp camera, and the output is H264 data, the current BK7256 series chip does not support
“uvc_jpg” means: use uvc camera, and the output is JPEG data;
“uvc_h264” means: use uvc camera, and the output is H264 data;
“dvp_jpg” means: use dvp camera, and the output is JPEG data;
“dvp_h264” means: use a dvp camera, and the output is H264 data, the current BK7256 series chip does not support
“uvc_jpg” means: use uvc camera, and the output is JPEG data;
“uvc_h264” means: use uvc camera, and the output is H264 data;
ppi:resolution,sensor output ppi,reference:
media_ppi_t.GC0328C: 640X480, 480X272, 480X320
HM_1055: 1280X720
GC2145: 1280X720, 800X600, 640X480
fps:frame_rate,sensor output frame_rate,reference:
sensor_fps_tGC0328C:5、10、20、25
HM_1055:5、10、15、20
GC2145: 10、15、20、25
2、wifi connection type
1.video_transfer -a ssid key
The development board is used as an AP, and the mobile phone is connected to this AP, which is similar to the mobile phone connecting to other wifi devices.
2.video_transfer -s ssid key
Use the development board as a station to connect to the mobile phone. The mobile phone needs to open the wifi hotspot. At this time, the mobile phone is equivalent to a router.
3.video_transfer -p ssid key
Use the direct connection method of the mobile phone, similar to the AP, on the mobile phone: WLAN–>Advanced settings–>WLAN direct connection, after searching for the device of the board, click connect.
Note
Note: In the first method, the bandwidth of the board may be insufficient, and the displayed video is not clear enough; in the second method, the effect of image transmission is the best because the bandwidth of the mobile phone is very sufficient; the third method has not yet been implemented.
Supports dynamic setting of resolution and frame rate, and does not support setting and replacing dvp devices
After exiting the video transmission, send the video_transfer -s|a ssid [key] [camera_type] [ppi] [fps] command, only camera_type, ppi and fps can be modified.
Testable solutions
dvp image transmission: video_transfer -a name_test 12345678
dvp image transmission: video_transfer -s name_station key dvp_jpg 640X480 25
uvc image transmission: video_transfer -s name_station key uvc_jpg 800X480 20
uvc image transmission: video_transfer -s name_station key uvc_h264 800X480 20
After the image transmission is turned off, send the above again to reset the camera parameters, including camera type, output resolution, and frame rate.
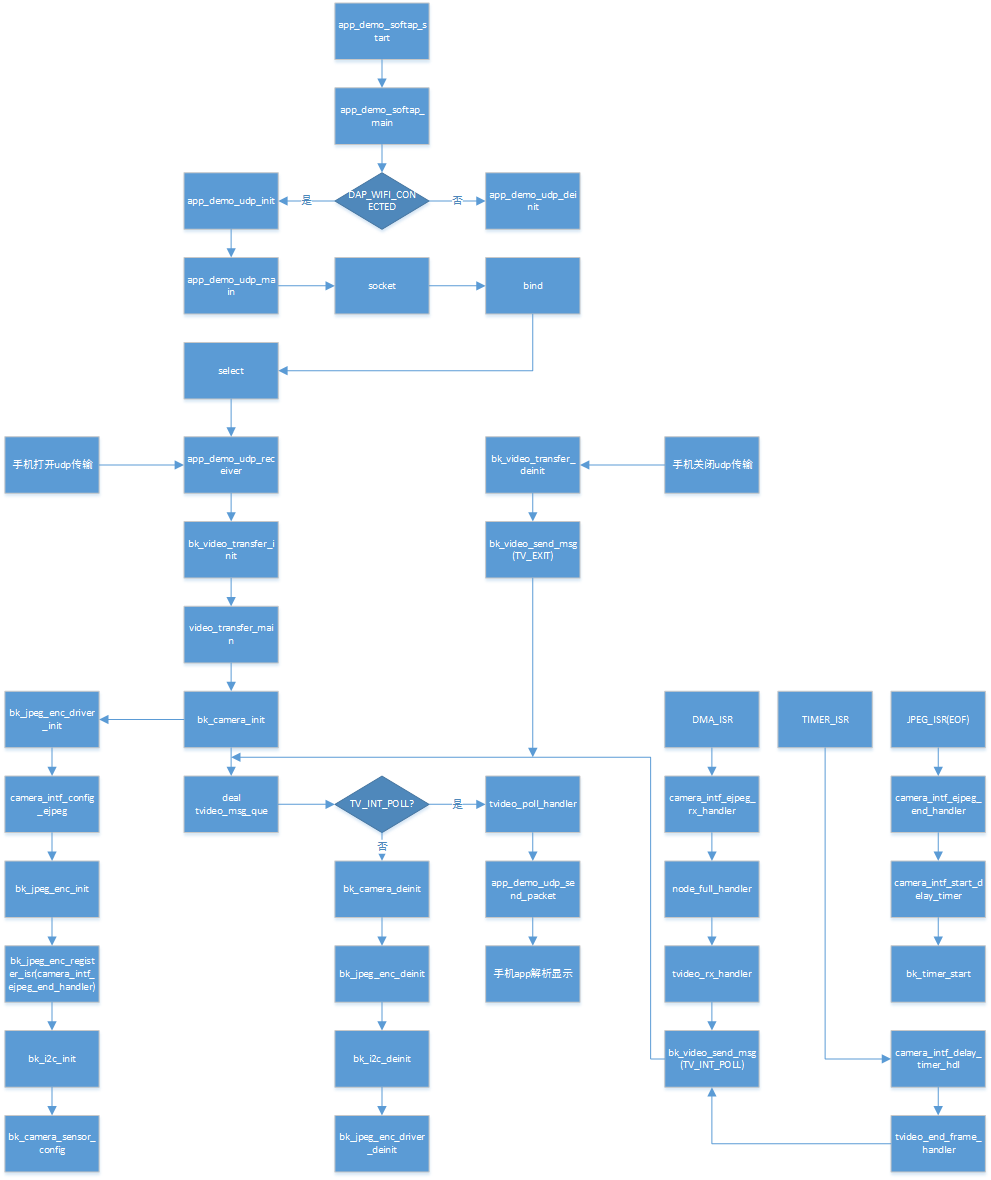
5、video transfer software process

Figure 7. video transfer function call
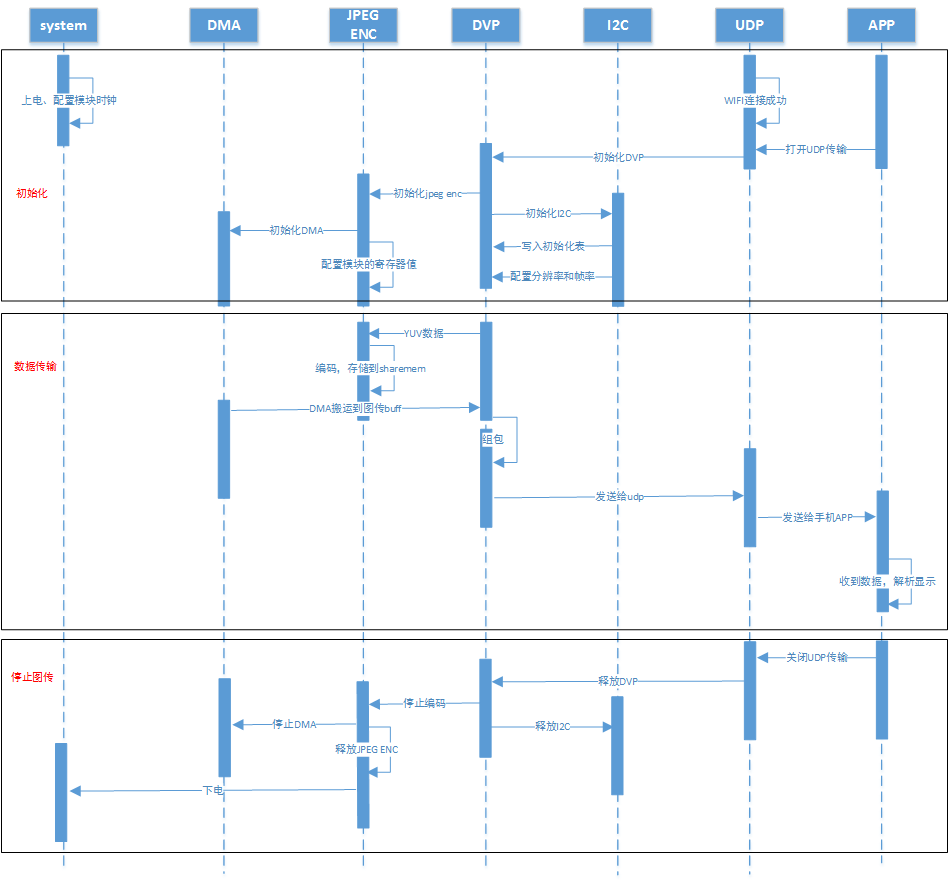
6、Calling between video transfer modules

Figure 8. video transfer modules communicate