安全功能应用指南
设计说明
BK7237的安全功能基于BK130,实现了security boot与flash加解密等功能。
security boot基于BOOT ROM的信任链延申,在BOOT ROM中对bootloader bin进行验签,在bootlaoder bin中对app bin进行验签,保证bootloader和app的真实性+完整性,用于确保只有客户的代码可以在芯片上运行;
使用flash加解密功能需要使用加密工具对bin文件进行加密,正常启动后硬件会自动解密,保障镜像的机密性。
使用BK7237的安全功能需要以下五个步骤:
1.镜像签名
2.镜像打包
3.镜像加密
4.添加CRC
5.烧写密钥和efuse使能安全功能
1. 镜像签名
当secureboot功能使能之后,BOOT ROM会强制对bootlaoder bin(flash的0x0地址开始)进行验签,只有通过BOOT ROM验签的bootlaoder才能够运行;对app验签在bootlaoder中进行,此功能是否开启可在bootloader中控制。 客户可以自己生成密钥对对镜像进行签名。
签名算法
ECDSA P256/P384
SHA256
签名指令
提供签名工具SignTool.exe和脚本,用于生成ECDSA密钥对和镜像签名,相关指令如下表。
Command |
Options |
Value |
Description |
|---|---|---|---|
sign |
-prikey |
file.der |
File containing ECDSA keypair |
-infile |
infile.img |
Input file with the image to sign |
|
-outfile |
outfile.img |
Output file containing the signed image |
|
-length |
hex |
Size of image for ECDSA process |
|
getkey |
-type |
BLKey BLKeyC |
As binary or C array |
-key |
file.der |
File containing ECDSA keypair (or pubkey) |
|
-outfile |
outfile |
Output file containing exported public key |
|
genkeypair |
-algo |
ecdsa256 |
ECDSA bit-length |
-outfile |
outfile.der |
Output file containing ECDSA keypair |
|
version |
To print the current version of this utility |
||
help |
To print this help message |
||
签名过程
运行脚本Signtool_GenKeypair.bat生成ECDSA密钥对。
运行脚本Signtool_GetKey.bat获取该密钥对中的公钥。
将bootloader.bin和签名工具放置在同一目录下,运行脚本Signtool_Sign.bat,使用生成的密钥对对镜像签名。

BK_SignTool
举例说明:
生成密钥对:SignTool.exe genkeypair -algo ecdsa256 -outfile ecdsa256.der
获取公钥:SignTool.exe getkey -type BLKeyC -key ecdsa256.der -outfile ecdsa256.c
镜像签名:SignTool.exe sign -prikey ecdsa256.der -infile bootloader.bin  -outfile bootloader_sign.bin -len 0x10000
重要
ECDSA密钥对生成脚本执行一次即可,生成的密钥对请妥善保管;获取到的公钥ecdsa256.c需要拷贝到project.txt中供第五步密钥烧写使用。
2. 镜像打包
镜像打包是根据flash分区文件configuration.json将2个或者多个镜像打包成一个镜像。
镜像打包指令
提供镜像打包工具cmake_Gen_image.exe用于打包。
Command |
Options |
Value |
Description |
|---|---|---|---|
genfile |
-injsonfile |
configuration.json |
input json file |
-infile |
xx1.bin xx2.bin |
input bin file |
|
-outfile |
all bin |
Output all bin file |
|
version |
To print the current version of this utility |
||
help |
To print this help message |
||
重要
镜像可以在签名之后进行打包,也可以在签名、加密和添加CRC完成后再进行打包; 对没有添加CRC的镜像进行打包,configuration.json文件请使用逻辑地址; 对添加CRC后的镜像进行打包,configuration.json文件请使用物理地址。
举例说明:
镜像打包:cmake_Gen_image.exe genfile -injsonfile configuration.json -infile bootloader_sign.bin app.bin -outfile all.bin
3. 镜像加密
镜像加密使用AES-XTS256加密方式,保证镜像的机密性。
加密算法
AES-XTS256
加密指令
提供加密工具XTS_AES_encrypt.exe,用于密钥生成和镜像加密。
Command |
Options |
Value |
Description |
|---|---|---|---|
genkey |
-outfile |
project.txt |
the AES key is saved to project.txt, including plaintext and ciphertext |
-version |
[0 - 9999] |
version of key |
|
encrypt |
-keyfile |
project.txt |
File containing AES key |
-infile |
infile |
Input file with the image to encrypt |
|
-startaddress |
Hex |
encrypt with logical start address |
|
-outfile |
outfile |
Output file containing the encrypted image |
|
version |
To print the current version of this utility |
||
help |
To print this help message |
||
加密过程
运行脚本XTS_AES_encrypt_getkey.bat,生成用于flash加密的密钥;如果当前目录下存在project.txt,则生成的密钥将插入到该文件中且文件名添加version前缀,否则将生成project.txt文件。
将需要加密的镜像和加密工具放置在同一目录下,运行脚本XTS_AES_encrypt.bat完成对镜像的加密。
举例说明:
生成AES密钥:XTS_AES_encrypt.exe genkey  -version 123 -outfile bk7237.txt
镜 像 加 密:XTS_AES_encrypt.exe encrypt -infile all.bin -startaddress 0 -keyfile 123_bk7237.txt -outfile all_enc.bin
重要
AES-XTS模式加密结果与被加密文件的地址相关,在需要单独加密app镜像时-startaddress应设置为该镜像的逻辑地址。 生成的project.txt文本中包含AES密钥的明文和密文,密钥管理者应保护密钥不能泄露, 使用bk_write.exe烧写密钥时只提供密钥的密文即可,密钥的明文请妥善保存后在project.txt中删除。
4. 添加CRC校验
CPU在读取FLASH上镜像时硬件会进行CRC校验,因此镜像需要添加CRC之后才可以烧写到flash中。 CRC插入规则:每32个字节计算出2个字节的CRC值,插入到该32字节之后;插入CRC之前的地址对应逻辑地址,插入CRC之后的地址对应物理地址。 上一步镜像加密后会输出对应添加CRC后的版本,可直接用于烧写。 提供工具cmake_encrypt_crc.exe用于添加CRC。
将需要添加CRC镜像和工具放置在同一目录下,运行脚本add_crc.bat即可。
举例说明:
添加CRC: cmake_encrypt_crc.exe -crc all_enc.bin
5. 烧写密钥和efuse使能安全功能
重要
Note:OTP和eFuse只能烧写一次,一但烧写后不可更改,需要谨慎操作! 在使能efuse的secure boot和encrypt之前,请确保flash中烧写有经过加签、加密、加CRC后的镜像,否则该芯片将无法更新镜像。
bk_write.exe会根据配置文件project.txt,将其中的签名的公钥、加密的密钥和eFuse的配置烧写到OTP和eFuse中。
配置文件project.txt的相关配置和烧写过程如下:
1.选择对应的project.txt
2.勾选main bin file,选择all_app_pack_sign_enc_crc.bin镜像
3.勾选OTP选项,会烧写public_key和aes_key
4.勾选updata eFuse选项,会烧写efuse_cfg和security_boot项
5.串口波特率设置为2000000,点击program后上电开始烧写
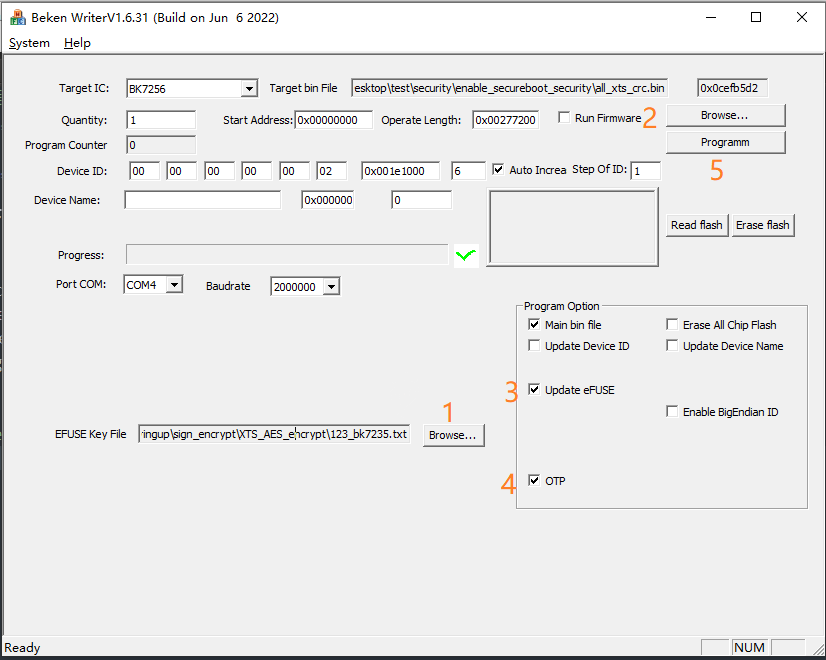
OTP和eFuse烧写
重要
为方便开发和测试人员测试,已将step1-4部署到编译服务器,build/app/project/encrypt路经下会生成all_app_pack_enc_crc.bin可用于step5使能安全功能前烧写,app_pack_enc_crc.bin用于开启安全之后镜像更新。
开启安全后镜像升级方式
开启安全后,当前bootloader将不能够升级,只能对app镜像进行升级。
方式一:使用bk_write.exe工具将加密、加CRC之后的app镜像烧写到对应的物理分区上。用于烧写的镜像可根据step1-4生成,也可以直接从编译服务器上获取。
方式二: 使用OTA升级方式,使用签名后的app,升级方法和非安全版本一样,见OTA升级。