Security Application Guide
Design Description
The security function of BK7235 is based on BK130, which implements security boot, flash encryption and decryption.
The security boot is based on the extension of the trust chain of the BOOT ROM. It verifies the signature of the bootloader bin in the BOOT ROM and the signature of the app bin in the bootloader bin to ensure the authenticity and integrity of the bootloader and app, and to ensure that only the customer’s code can run on the chip;
To use the flash encryption/decryption function, you need to use encryption tools to encrypt the bin file. After normal startup, the hardware will automatically decrypt to ensure the confidentiality of the image.
The following five steps are required to use the security function of BK7235:
Image signature
Image packaging
Image encryption
Add CRC
Burn key and efuse enable security function
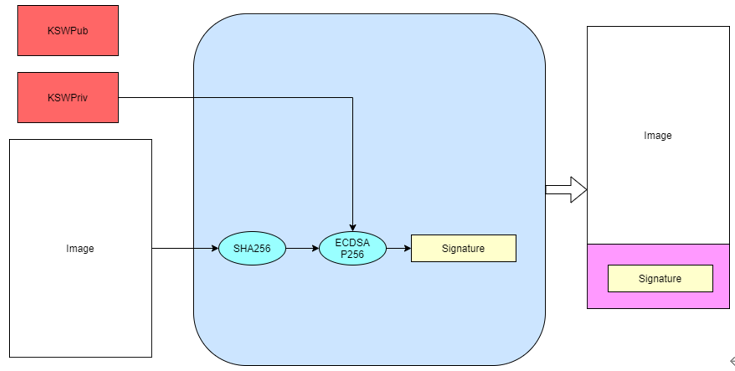
1. Image signature
When the secureboot function is enabled, the BOOT ROM will force the signature verification of the bootloader bin (starting from the 0x0 address of the flash). Only the bootloader that passes the signature verification of the BOOT ROM can run; The app signature verification is performed in the bootloader. Whether this function is enabled can be controlled in the bootloader.
The customer can generate a key pair to sign the image.
signature algorithm
ECDSA P256/P384
SHA256
Signing Instructions
The signing tool SignTool.exe and script are provided to generate ECDSA key pairs and image signatures. The related instructions are shown in the following table.
Command |
Options |
Value |
Description |
|---|---|---|---|
sign |
-prikey |
file.der |
File containing ECDSA keypair |
-infile |
infile.img |
Input file with the image to sign |
|
-outfile |
outfile.img |
Output file containing the signed image |
|
-length |
hex |
Size of image for ECDSA process |
|
getkey |
-type |
BLKey BLKeyC |
As binary or C array |
-key |
file.der |
File containing ECDSA keypair (or pubkey) |
|
-outfile |
outfile |
Output file containing exported public key |
|
genkeypair |
-algo |
ecdsa256 |
ECDSA bit-length |
-outfile |
outfile.der |
Output file containing ECDSA keypair |
|
version |
To print the current version of this utility |
||
help |
To print this help message |
||
Signing process
Run the script Signtool_GenKeypair.bat generates ECDSA key pairs.
Run the script Signtool_GetKey.bat gets the public key in the key pair.
Place bootloader.bin and the signature tool in the same directory, and run the script Signtool_Sign.bat, use the generated key pair to sign the image.
BK_SignTool
For example:
Generate key pair:SignTool.exe genkeypair -algo ecdsa256 -outfile ecdsa256.der
Get public key:SignTool.exe getkey -type BLKeyC -key ecdsa256.der -outfile ecdsa256.c
Image signature:SignTool.exe sign -prikey ecdsa256.der -infile bootloader.bin  -outfile bootloader_sign.bin -len 0x10000
Important
The ECDSA key pair generation script can be executed once. Please keep the generated key pair properly; The obtained public key ecdsa256. c needs to be copied to project.txt for use in step 5.
2. Image packaging
Image packaging refers to packaging two or more images into one image according to the flash partition file configuration.json .
Image Packaging Instruction
Provide image packaging tool cmake_Gen_Image.exe is used for packaging.
Command |
Options |
Value |
Description |
|---|---|---|---|
genfile |
-injsonfile |
configuration.json |
input json file |
-infile |
xx1.bin xx2.bin |
input bin file |
|
-outfile |
all bin |
Output all bin file |
|
version |
To print the current version of this utility |
||
help |
To print this help message |
||
Important
Images can be packaged after signing, or after signing, encrypting, and adding CRC; Package the image without CRC. Please use the logical address for the configuration.json file; Package the image after adding CRC. Please use the physical address for the configuration.json file.
For example:
Image packaging:cmake_Gen_image.exe genfile -injsonfile configuration.json -infile bootloader_sign.bin app.bin -outfile all.bin
3. Image encryption
The AES-XTS256 encryption method is used for image encryption to ensure the confidentiality of the image.
encryption algorithm
AES-XTS256
encryption instruction
Provide encryption tool cmake_xte_aes.exe, used for key generation and image encryption.
Command |
Options |
Value |
Description |
|---|---|---|---|
genkey |
-outfile |
project.txt |
the AES key is saved to project.txt, including plaintext and ciphertext |
-version |
[0 - 9999] |
version of key |
|
encrypt |
-keyfile |
project.txt |
File containing AES key |
-infile |
infile |
Input file with the image to encrypt |
|
-startaddress |
Hex |
encrypt with logical start address |
|
-outfile |
outfile |
Output file containing the encrypted image |
|
version |
To print the current version of this utility |
||
help |
To print this help message |
||
Encryption process
Run script XTS_AES_encrypt_Getkey.bat, which generates the key for flash encryption; If project. exists in the current directory Txt, the generated key will be inserted into the file and the version prefix will be added to the file name. Otherwise, the project.txt file will be generated.
Place the image to be encrypted and the encryption tool in the same directory, and run the script XTS_AES_Encrypt.bat encrypts the image.
For example:
Generate AES key:cmake_xte_aes.exe genkey  -version 123 -outfile BK7235.txt
Image encryption:cmake_xte_aes.exe encrypt -infile all.bin -startaddress 0 -keyfile 123_bk7235.txt -outfile all_enc.bin
Important
The AES-XTS mode encryption result is related to the address of the encrypted file. When an app image needs to be encrypted separately, - startaddress should be set to the logical address of the image. The generated project.txt text contains the plaintext and ciphertext of the AES key. The key manager should protect the key from disclosure, Use bk_write.exe only provides the ciphertext of the key when burning the key. Please save the plaintext of the key properly and delete it in project.txt.
4. Add CRC check
When the CPU reads the image on flash, the hardware will perform CRC verification. Therefore, the image can only be burned to flash after adding CRC. CRC insertion rule: CRC value of 2 bytes is calculated for every 32 bytes and inserted after the 32 bytes; The address before the CRC is inserted corresponds to the logical address, and the address after the CRC is inserted corresponds to the physical address. After image encryption in the previous step, the version with CRC will be output, which can be directly used for burning. Provide tools cmake_encrypt_crc.exe is used to add CRC.
Place the tools and image that need to be inserted into the CRC in a common directory, and run the script add_crc.bat.
For example:
Add CRC: cmake_encrypt_crc.exe -crc all_enc.bin
5. Burn key and efuse enable security function
Important
Note:OTP and eFuse can only be burned once. Once they are burned, they cannot be changed. Be careful Before enabling secure boot and encrypt of efuse, make sure that the flash has an image that has been signed, encrypted, and CRC added, or the chip will not be able to update the image. bk_Write.exe will burn the signed public key, encrypted key and eFuse configuration into OTP and eFuse according to the configuration file project.txt.
The configuration and writing process of the configuration file project.txt is as follows:
1.Select the corresponding project.txt
2.Check main bin file and select all_app_pack_sign_enc_crc.bin image
3.Check the OTP option, and the public_key and aes_key will be written
4.If the updata eFuse option is checked, efuse_cfg and security_boot item will be burned
5.Set the serial port baud rate to 2000000, click program, and then power on to download
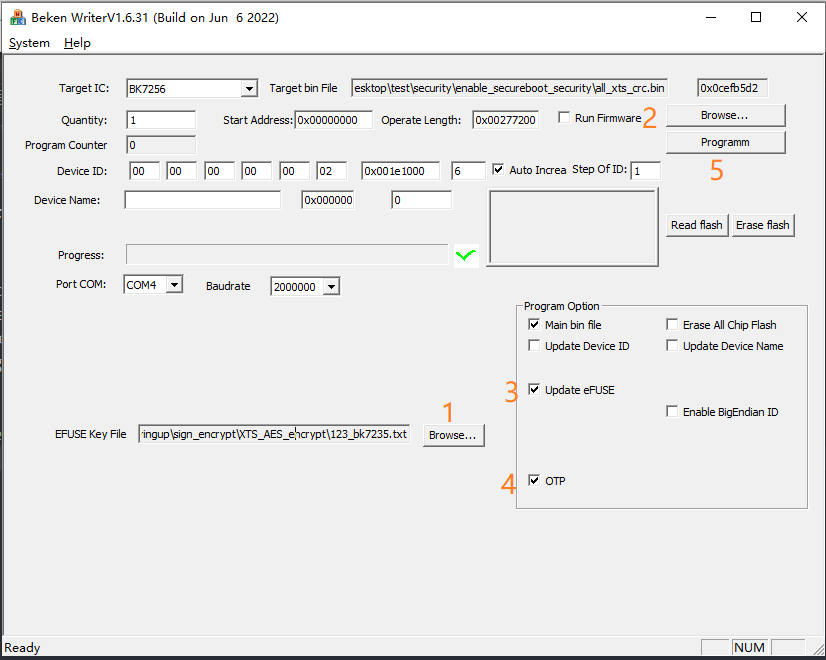
OTP and eFuse burning
Important
In order to facilitate development and tester testing, step1-4 has been deployed to the compilation server, and the build/app/project/encrypt path will generate all_app_pack_enc_crc.bin which can be used for burning before step 5 enable the security function, and app_pack_enc_crc.bin is used to update images after security is enabled.
Image upgrade mode after security is enabled
After security is enabled, the current bootloader cannot be upgraded, only the app image can be upgraded.
Method 1:use bk_write.exe tool burns the encrypted app image with CRC to the corresponding physical partition. The image used for burning can be generated according to step 1-4 or directly obtained from the compilation server.
Method 2: Use the OTA upgrade method. Use the signed app, the upgrade method is the same as the non security version. See OTA upgrade.